Thursday, July 10, 2014

DIY Paper Airplane Baby Mobile

Well, most of y'all may know that our twin boys arrived earlier than expected, on June 1st!  After spending 18 and 22 days in the NICU, we finally have both of them home and are adjusting to having 3 under 3 (or actually, 3 under 2-1/2!)  I had hoped to finish the nursery posts before the babies arrived, but they had their own agenda :)  Newborn photos to follow one of these days...

Anyways, getting back to the nursery posts. Finally, a project that does not involve painting!  Hallelujah! 


When I was on bed rest before Ward was born, I spent my spare time in the hospital making this nursery bird mobile.  It is still hanging in Ward's room, and even though he's not a baby anymore, I still can't bring myself to take it down yet. 

Anyways, I couldn't really re-use it in the twins nursery b/c I now need two mobiles!  And since I don't have all the time I used to, I wanted to make something super easy....and paper planes were the easiest thing I could think of.  Now, there are a lot of steps here, but each part of this mobile can easily be done in front of the tv, so it just took some patience (and a helpful husband to speed things up). 

Here are the materials I used:


22" embroidery hoop
Yarn and/or Twine
Wooden Letter (not necessary, but I wanted to personalize each one)
Scrapbook paper in various patterns/colors
Glue Stick
Scissors
Fishing Line
Small screw-in hooks
*Paint (if you're like me and change your mind after you're finished)

First, carefully break off the hardware on your embroidery hoop with some pliers or scissors.  If the wood chips it's not the end of the world....as you can see mine did a little.  


Then, adjust the broken piece to be the same size as the smaller one.  Duct tap the two pieces on top of each other so the hoop will be thicker when you wrap it.


I wrapped my hoop with this burlapy twine I found at Michael's.  It doesn't take that long and is easy to do in front of the tv at night.  Once the entire hoop was wrapped, I just used a drop of fabri-tac to secure the end piece to the hoop.


Then I took my colorful yarn and wrapped 5 evenly spaced hanging points on the hoop.  An easy way to find the correct hanging points is to lay your hoop on a sheet of paper and draw a pentagon in the center.  I just eyeballed it and when I checked the measurements it was pretty spot on.


After the hoops were wrapped, I took white yarn and tied a knot around each colored hang point, and then knotted them together at the top.  Just make sure you measure out the same amount of yarn for each hang point and you should end up with an even-hanging hoop.

Because I wanted to do something a little different, I took wood letters and wrapped them in my colored yarn and then attached the white yarn to a screw in hook at the bottom of the letter.  (You will also need a screw for the top of the letter too).

Once the hoops were finished, I started on the planes. Take two pieces of the scrapbook paper and glue them together using a glue stick.  


We debated making different airplane styles, but since the paper was pretty thick with the two pieces back to back, it was easier to fold just a classic style plane.  If you need to know how to fold a classic paper plane you can find out here :).  To get the size plane we wanted, we had to scale down our sheets by 1/2, so 4.25"x 5.5"

After Trey folded the planes, the tricky part was hanging them so they didn't droop or nose dive.  We ended up using a small pin to poke 3 holes through the plane, and then threaded fishing line through each hole and knotting at the top. (Making sure that they hung level.)  Then, I carefully cut the unnecessary 2 strings, which left me with one string that I tied to the embroidery hoop.


After the mobiles were finished, I had a change of heart and decided I didn't want the letters to be wrapped in yarn anymore (classic me), so I unscrewed the pieces, cut off the yarn and Trey painted them the darkest blue from the ombre dresser for a cleaner look....(I guess I lied, there was painting involved.)  Then, I simply attached the pieces back together and here it looks like all together:


To enhance the background and add some color on the wall behind the mobiles, I used 22" embroidery hoops inset with light blue canvas fabric.  Then, I took some plain white felt and cut out cloud shapes and glued them with fabric-tac. 


To hang them from the ceiling, we installed a drywall hook and I found some old drapery tie backs that I had in my fabric stash, which ended up working perfectly.


And here is the view that the little guys will see


For the record, I DID miraculously have the nursery completed before the babies arrived, but unfortunately had a picture fall off a wall and break, so once I get to replacing it I'll post pictures of the completed room!


Tuesday, May 27, 2014

DIY Ombre Dresser

My, my.  It seems like all poor Trey does every weekend is pick things up I find on craigslist and paint them.  I know he is sick of it, but luckily we are seeing the light at the end of the tunnel as far as painting projects go.

When I was deciding how to layout the twins nursery, I wanted the cribs to be placed perpendicular to the wall to create some interest in the room (so it wasn't just a wall of cribs).  In order to separate the two crib spaces, I was scouring CL for a tall but narrow dresser that could fit in between the two.


I came across this antique white dresser, and even though it was more than I wanted to pay, the dimensions and shape were perfect for what I was looking for.  So, I once again sent Trey out to get it and gave him instructions on how I wanted it painted.  

I love the ombre dresser look for kids room and thought this would be a fun thing to try.  I selected a color strip from a Benjamin Moore paint deck and got the tiny sample sizes of each color to paint on each of the 5 drawers.  


For some (annoying) reason, sample sizes only come in flat or eggshell finishes, so we opted for the eggshell and then had to add a coat of satin poly on top.
There were quite a few blemishes on the actual piece that needed sanding/patching before painting (and we primed the entire piece too), but once everything was complete it now looks like this!  


In addition to our changing table, I know this extra storage is really going to come in handy!  I love how bright and cheerful it is :)  

Note: In case you can't read the swatch above, colors used are BM "clear skies", "old pickup blue", "seaside blue", "blue lagoon" and "venezuelan sea".  The rest of the piece was just painted plain white that we found in the garage!

Monday, May 19, 2014

Vintage Campaign Dresser

Y'all.  I am really excited about my latest Craigslist find....a vintage campaign dresser!  


(In my excited state I forgot to take a real before photo, but here is the image from the post...screen shot from my iphone)

I have ALWAYS wanted one of these.  I'm sure many of you have seen the numerous re-do's on pinterest.

When I saw the ad posted, I immediately replied as quickly as I could type, but was disappointed when the response was that a couple people were interested in the "set" before me.  The "set" being the dresser and a matching twin headboard (I had just inquired about the dresser).  

I don't need another twin headboard, but I figure I'm having three boys so eventually I'll be able to use it one day (after an upholstery makeover of course...another future project).


Anyways, the person selling had his number on the return email so I called him and said I would take the set, didn't need to see them first, and could pick up right away.  I wanted that dresser!

Trey went and picked it up for me that afternoon and he worked on it over the course of one week.  Unfortunately, the wood grain of the piece was a little too visible, so my dreams of a lacquered finish weren't going to work (the glossier the paint, the more imperfections show up!)  

Also, another disappointment was the hardware was not brass, instead it was a galvanized metal (bleh).  Although I prefer real brass, I figured we could spray paint the hardware to get the effect.

To make things a little on the tough side, the L-brackets were not screwed in and we didn't want to damage them by trying to remove, so Trey had to spray paint the hardware while on the dresser after taping it off.  


The drawer hardware was easier because it could be unscrewed.  The primer we used was  Rustoleum's metal primer to ensure the paint would stick with heavy, everyday use.  Then, we used Design Master's Gold Medal spray paint on top.


Then, Trey primed the rest of the dresser with a brush (I didn't want to risk getting drips if we spray painted.)


And for the color we debated between Benjamin Moore's Narragansett Green and Polo Blue.  Trey really wanted the deep navy polo and I was leaning towards the Narragansett.  

Guess who won?


(In case you can't tell, it was me) :)


I'm thrilled with how this turned out.  I especially love how the color of the dresser changes depending on the time of day.  When I was originally looking on CL for a dresser, it was for Ward's room (so I could move his changing table into the nursery). But I love the campaign so much I decided to move it into our bedroom, and Ward inherited our old wooden dresser.  If I can ever get to styling the dresser/mirror/lamp vignette I will include photos later :)

Now on to wrapping up the nursery...I have lots to share on it later!


Friday, April 11, 2014

The Unintentional Project- Craigslist Dining Chairs

Do you ever find yourself in a situation where you are doing something that you shouldn't be?  And you know it?  But you don't care?  That's me.

Since we are expecting twins, I should be checking things off my list such as organizing the house, purging old baby things to make room for new, working on a nursery.  You know, normal stuff that pregnant people do.

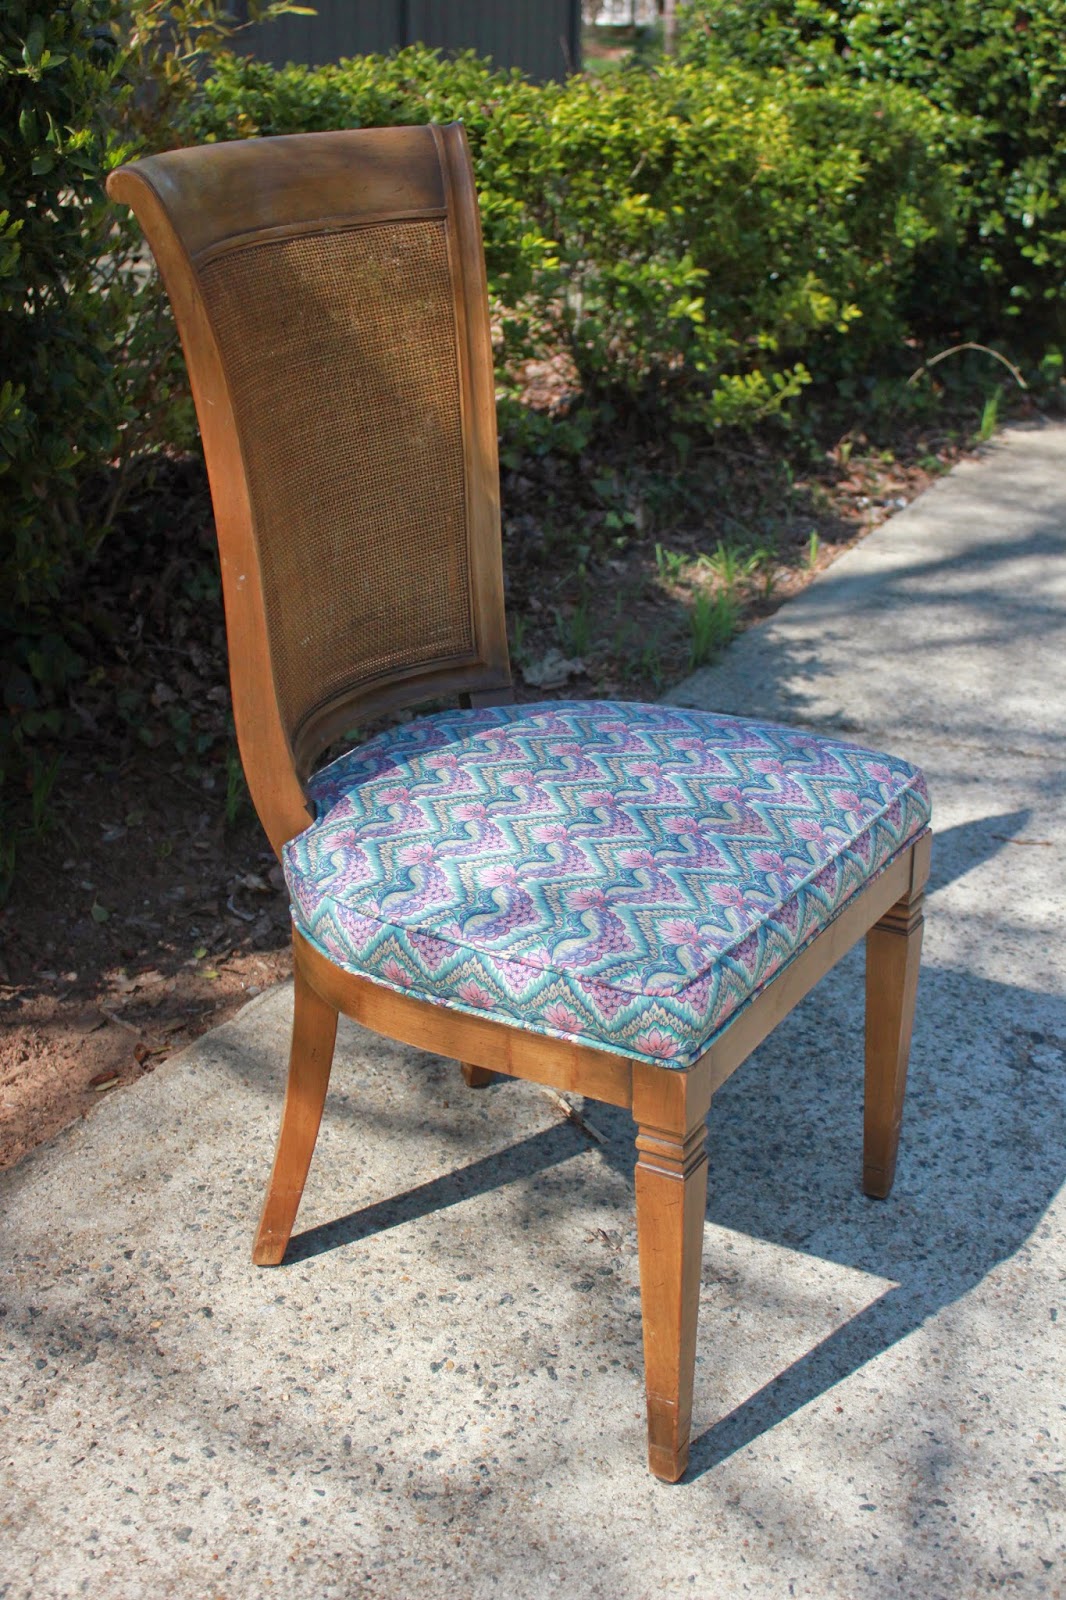
Well, this is totally off base.  I found this great dining chair set on craigslist a few weeks ago and had to get it.  I drove over an hour to go pick up the chairs (but could only fit 6 in my car) and then had Trey drive back over the weekend and pick up the remaining chairs and table.  The problem?  

I already own dining chairs and a dining table. 

In my defense, I've never been too keen on my current chairs.  They, too, were a CL find.  I bought them for a great price and even had them reupholstered until I could afford something more my style one day.  I had been eyeing these chairs, but probably wouldn't bother buying them for another million years.


So, when I found these Widdicomb chairs for a steal I HAD TO HAVE THEM!  They may not look like much now, but I have big plans for these lovely ladies.


When I first saw the post on CL- I immediately remembered this image that reminded me of the chair style:
Via Alice Lane Home, Photo by Ashlee Raubach
Of course the chairs above are more elegant, fully upholstered, and painted (what looks like) metallic frames with nailhead trim.  I wouldn't go this route, but I like the idea that if one day I want to upholster the back I can change things up.
As for now, I love the cane backing and want to keep it, but am definitely thinking of painting the frames lighter and leaving the cane natural....possibly like in these examples (These are pretty traditional, so wouldn't go that far, but love the natural cane):

Via Hello Lovely Decor
Via Mustard Seed Interiors
I originally thought I would just sell the table and keep the chairs.  But I really love the table too, it has such delicate lines I don't know if I want to sell it yet.  For now, it's living in my garage until I can figure that out....hence the beautiful photos.


Who knows how long this project will actually take (since Trey will be the one painting and waxing, haha).  And it's really not a priority.....But I'll keep you posted when (and if) we ever finish!

PS- I have 8 upholstered chairs for sale now if anyone would like to take them off my hands ;)

Update: Chairs have been sold!  Did I mention I love CL?  Now I need to get started on the nursery...

Thursday, March 20, 2014

Gibbs Gardens

Has anyone ever been to Gibbs Gardens north of Atlanta (in Ball Ground, GA)?  My friend Elise recommended it last week and we ended up going last Saturday when the weather was gorgeous for my mother-in-law's birthday.


The gardens are huge, and right now they have a daffodil festival....there are over 20 million daffodils!  

It's a great place to bring kids, lots of open space to run around and you can even bring a picnic, or eat at the cafe on site.  Or have a snack on a big rock.
Ward loved riding on the tram, that takes you all over the garden.

And smelling the daffodils.
And hiding in the daffodils...It's kind of like playing Where's Waldo?
  Oh, there he is.


 We did have to keep him from trampling them though.


Oh, and of course, throwing gravel was also a main attraction :)


It's supposed to be nice this weekend, go check it out while all the flowers are in bloom!

Friday, March 14, 2014

Happy 2nd Birthday, Ward! (And a impromptu vacation)

My, we have been busy!   It all started a couple weeks ago when Trey and I had been discussing going on a small & easy family trip with Ward (a babymoon plus a baby, so to speak) to spend some quality time together as a family of three before I get too far along.  I thought we had plenty of time until we realized that Ward wouldn't be able to fly for free after he turns two...which was in 10 days.  

Luckily, we were able to quickly book a trip last minute to Naples (yay, skymiles points!) and Trey's aunt and uncle were nice enough to let us stay in their house while they were traveling.  It was SO nice to get out of frigid Atlanta and hang out in 80 degree weather for a few days. 

We went to the beach


Swam in the pool


Saw Dolphins at the pier


and even fed a Giraffe (or as Ward would say, Gee-Raf) at the zoo

When we got home, Ward's birthday was that weekend so we had a quiet birthday (with a cupcake of course)


and then a family party the next day (with more cupcakes....the boy loves cake)

Yes, that is my O'doul's.  Keeping it classy.


After all the festivities last week, we're hoping to relax this weekend! 

Have a good one!