Thursday, May 24, 2012

DIY Column Lamp #1

I had been looking for a floor lamp for quite some time, but couldn't find anything I really liked that wasn't over $400.  I originally wanted a driftwood lamp from Arteriors:


But it wasn't exactly right. And neither was the price.  I was hoping to find something with a more aged look with some antique wood.  You would think this exists, right?  No, of course not.  I found one lamp that was great at Scott's Antique Market, but it was way overpriced. (Sorry, didn't take a picture!) I showed Trey and he told me he could make the lamp with some antique columns.  Now why didn't I think of that?


Still at Scotts, we walked over to the outdoor area to look at the columns and found the perfect pieces.  It's hard to tell from the photo, but it's an aged wood with light blue paint remnants.  I think the pair of column halves was around $50.  
They were already cut in half with the center routed out- perfect for the wiring.
All Trey had to do was buy a lampkit (you can get them at Lowe's or Home Depot), wire it through the center and fuse the two column pieces together with his brad nailer.  As you can see from the photos above, the columns were originally pretty tall.  I knew I wanted the lamp to be around 65"H, so he cut off the excess flat square portion on the ends and made it into a square base. He also drilled a hole out of the back of the base for the wiring to exit and added levelers to the bottom.
We left the top a little rough, it's just the lamp kit exposed and screwed to the column.  All that was left was to add a harp, bulb, shade and finial.
And there you have it.  Here's the finished piece!
 
And a detail shot...I forgot to mention Trey added a coat of polyurethane before wiring to seal the paint from chipping further.  It darkened the overall look but I still think it looks great.
The cost to make this was $60 bucks.  The shade was the most expensive part, $50.  Still SO much cheaper than buying a floor lamp....cheaper than what I would want anyways. ;)
We liked it so much he made another one- I'll add photos of it next time.


Wednesday, May 16, 2012

Ode to the Bird

Meet Birdie.  


She's our husky mix.  75% husky, 25% boykin spaniel to be exact.  Yes, we are those people who bought her a DNA kit for Christmas.  Birdie is the sweetest dog, but she like most huskies gets into a lot of mischief.  For example, her new adventures include fence hopping.  You see, she will jump over our fence (even when she has a dog friend to play with) and proceed to hop over the neighbors fence to go play with their dogs.  Isn't that so independent of her?


I digress.  Anyways, before Ward was born Birdie was our only child and she was treated as such.  One day we were at Scott's Antiques and I saw these little cast iron statues.  Yes, I believe it's supposed to be a german shepard, but it reminded me of Birdie so I had to buy it...I think it was 5 bucks.  


I took it home and spray painted it white like the bird.  She supervised.

Now it lives front and center on our mantle so she is still represented in our house, even though she has been demoted in the favorite child rank.    Poor thing is finally coming to terms with having a baby brother...


All in all, it was a super cheap way to add a personal touch to the mantle in addition to the traditional framed photos. :)

Friday, May 4, 2012

Amateur Baby Photo Shoot

Greetings all.  We've been having fun playing with the new camera (Canon Rebel T2i)...it was a Christmas present from Trey's parents.  I am such a beginner and still trying to figure out which settings to use when....any suggestions on online tutorials for DSLR beginners will be greatly appreciated!


Not that these are professional in any way, but for what it's worth I think some of these turned out pretty darn cute.  Here are some of our favorite pics of Ward if you'd like to see...


When someone saw this one below,  there was a debate on who's hands they were.  Obviously not Trey's due to the rings....come on people. ha.
Oh and another note...it looks like Ward only has four toes on the right foot.  I swear he really has five :)

This next one cracks me up.  It is very obvious that we are new parents and can't put a diaper on right....he's such a peanut here!


We debated on using a traditional photo of sleeping Ward for the birth announcement, but when we saw this one, we just knew we had to go with it!


Love that little smile.  Definitely needed the fast shutter speed to capture this one.  
We're looking forward to having more baby photo shoots in the future!  Hopefully my camera skills will start to improve...


Enjoy your weekend!


Thursday, May 3, 2012

Our Custom Farm Table

The first real piece of furniture we bought after moving into our house was a dining table.  However, I can be very picky when it comes to buying furniture. My taste tends to run on the expensive side, but our budget does not.  I knew I wanted something large with a slab top.  Yes, a slab top. From a giant redwood.  Just kidding.

Love this one from Broadbent Furniture

Or this from BBDW:


And of course the tables from Hudson Furniture are beautiful:

However, these are a little too crazy expensive for our tiny budget and bungalow.  Not to mention the bases are gorgeous, but a little too commercial design for me.  After scouring the internet for farm tables, I still didn't want to spend $2000+ at crate and barrel, pottery barn or restoration hardware.  Not to mention thousands more for a true designer piece.  I'm waaaay too cheap for that.


Soo..I went to craigslist, my go-to cheap furniture finder (as I've already mentioned, this will probably be a reoccurring theme!)  I thought about naming this blog "Sh*t I find on craigslist"...but decided against it.  

Anyways, I didn't find an actual table on Craigs, but I found a guy who could make one. I sent him these images with dimensions and about 4 weeks later, this is what he delivered to our house:


Of course he couldn't build the table with an actual slab top like those shown above- that alone would cost a fortune!  Instead, he assembled the planks together and cut along the natural edge to give it an irregular, live-edge feel.


We were very happy with the results!  The table is 8 ft. long and actually came with two 24" extensions, so it can get up to 12 ft long!  The length is ridiculous, I know.  But one day when we host Thanksgiving or Christmas dinner I'll never have to pull up a card table to make room for everyone. ;)


Wednesday, May 2, 2012

Goodwill Chair Revamp

My mother-in-law Brenda actually was the one who found this great chair at the goodwill...I think she said it was $5.  (Please excuse the awful picture!)


She had quickly spray painted the frame black (I don't have a photo of the true before- sorry!) and stapled some black & white fabric over the upholstery for my sister-in-law Caroline's apartment.  After Caroline graduated from college, the chair was without a home and somehow I was able to inherit it.  

Of course, I wanted to do a full reupholster...new foam, new fabric, etc.  I also needed to have the cane arms repaired.  I researched caning and it seemed WAY to hard for even me to try, so I found a local guy to fix it for me.  Quick and easy.

I have never attempted to reupholster anything before in my life.  So let me preface the next steps by saying I am a total amateur, and I know a professional could do a much better job.  But here's what I did...and it cost me next to nothing:

First I removed the stapled fabric from Brenda and you can see the original upholstery:


The next part was MUCH more time consuming.  I had to remove the next layer of fabric and all.the.nails.  This took forever.  The nails were never ending....I don't know how old the chair was, but the nails were ancient.


Once the fabric was off, I studied the foam to see how I could replace it.  I basically just took it all out, and cut to size a very thick layer of my own.  Then, I covered the foam with some scrap burlapy fabric I had lying around to contain it (used this as a muslin, if you will...)


We have a rather small living room, so I knew this chair would be a perfect accent piece and in addition creating another place to sit.  I wanted to upholster it in a fun, cheerful fabric.  Enter the chevron.  


I know, I know.  Chevron is overdone these days.  I have to admit that I bought the fabric last summer and finally did this project back in August so maybe it was in the peak of the trend....oh well.  I still think its a great graphic.  As you can see above, I used the original fabric scrap as a template for the new upholstery.  I then pulled the fabric as tight as I could and stapled it around the edges with a staple gun.  For the seat I just pulled it under and stapled to the bottom.


Once that was complete there was one problem.....the exposed staples.


I thought about buying some pre-made cord in a contrasting gray to make my life easy.  But I am overly ambitious and thought if I came this far I should at least try to make my own welt.....

Of course the fabric store I went to didn't have the large cord size I needed...so I bought the smaller cord they had in stock and decided to make a double welt instead.  Now this is where things get very amateurish.

I basically just cut the fabric into small strips and sewed them around the cord.  Then I sewed the two pieces of cord together to create a double welt.  Voila.


Attaching it to the chair was much more difficult.  I just used a hot glue gun around the edge and tried my hardest not to let the seams show.  


Of course it's nowhere near perfect, but in the end it turned out good enough for me! :)


Tuesday, May 1, 2012

Our house

For those of you that know me, this post is a blast from the past.  But better late than never, right?


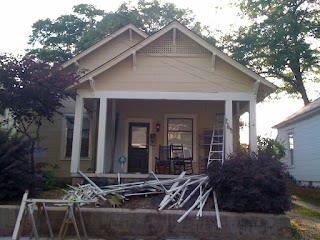
When Trey & I bought our house almost three years ago it looked like this.....

We had always talked about opening up the screened in porch.  I know in the south people love screened in porches to keep out the mosquitoes, but I always find they get trapped in the porch and then you just get attacked like crazy.  Not to mention the previous owners at one point had the interesting flooring choice of carpet (yes, carpet) out there.


Then one day I drove home from work and the house looked like this....


ummm. yeah.  My husband and his buddy spontaneously decided to rip it all down.....and then they discovered the columns had rotted out and had to be replaced a.s.a.p.  The timing wasn't great to start the project as we were leaving to go out of town the next day to celebrate our anniversary!  After a quick trip to Lowe's he managed to stabilize the columns and we kept our fingers crossed that it wouldn't collapse while we were out of town.


Now I'm going to leave out a lot of details as this seems like so long ago, but we Trey had a lot of work to do.  Long story short, he re-built all the columns, added a hand rail, extended the sidewalk and added a brick facade to the walkway.


Finally, we had the house painted and now it looks like this:


 We love the new and improved look.  Sadly, we've recently decided to put the house up for sale and venture out to the 'burbs to be closer to the grandparents...and avoid the extremely high cost of daycare!  The next few weeks we will be enjoying the porch (sans mosquitoes) while we can!

Ward loves the swing!


Wednesday, April 18, 2012

$25 Changing Table

Welcome to Long + Found!  


Basically, I'll be blogging about some cheap diy projects around our house, (some new and some old) and updates on our life.  We just welcomed the birth of our baby boy Ward, born March 7th and have been enjoying life as new parents.  Though his nursery is not finalized, I thought I'd share a small project that I'm taking full advantage of these days...


When it came to decorating the nursery, we knew we needed a changing table.  I refuse to  buy a new one for hundreds of dollars when I knew we could make something that had more character and for a fraction of the price!  So I did what I normally do when looking for a furniture piece....search Craigslist.  And lo and behold I found this beauty for $25:


The original faux finish crackle paint job is rather scary, but I loved that it was solid wood, had great lines and had perfect dimensions for a changing table.  All we needed to do was build the top box for the changing pad.   That's where my husband, Trey comes in.  I found this great template online and he took it from there.  We didn't follow the template exactly, but it gave us an idea of where to begin.  Once the top was assembled it looked like this:


Trey then had to sand down the surface of the dresser to remove the crackled faux finish and fill in some chips on the drawer fronts. 


Then he had to apply many coats of paint in order to achieve a smooth surface.  He forgot to prime the dresser, which would have eliminated a coat or two, but oh well.  In the end here's the final result!


I love it- it's the perfect height and we can fit all of baby Ward's diapers, wipes, creams, etc. in the compartment on the side.  We are definitely getting our use out of it these days :)


Note: the paint color we used is Olympic "antique silver" and the knobs are from Lowe's.